If you’re gearing up to set up Windows 11 on a compatible machine via a fresh start, a bootable USB is essential. This article will guide you through the process.
While initiating a fresh Windows 11 installation directly from the Media Creation Tool or an ISO file is possible, using a USB installation medium remains the most efficient method. It’s especially crucial if you’re setting up Windows 11 on a brand-new machine or one with a blank hard disk.
To craft a bootable USB for Windows 11 installation, several methods are available, such as the Media Creation Tool, Rufus, and the Command Prompt.
This article will walk you through the steps to make a USB bootable medium for both in-place and fresh Windows 11 installations compatible with UEFI. These steps are applicable whether you’re on Windows 10 or 11.
Crafting a Windows 11 bootable USB via Rufus:
To fashion a Windows 11 bootable USB using Rufus, follow these instructions:
- Navigate to the Rufus website.
- In the “Download” area, select the link for the newest version.
- Launch the tool by double-clicking its executable.
- Access the Settings via the third button from the left at the page’s base.
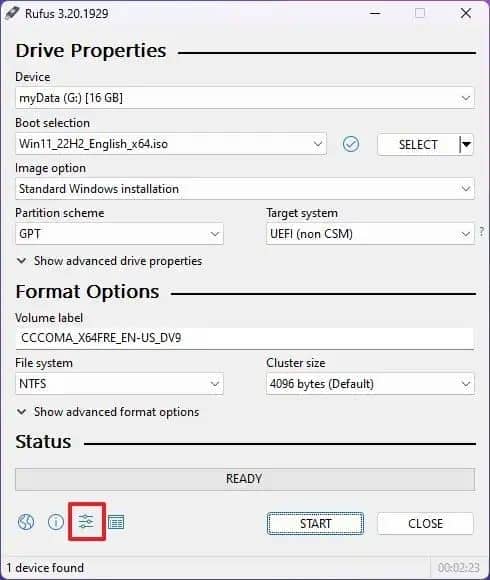
- In “Settings”, set the “Check for updates” to the Daily option.
- Exit the settings.
- Relaunch Rufus.
- Optionally, in the “Device” area, choose the USB drive for the installation medium.
- For “Boot selection”, opt for the “Disk or ISO image”.
- Use the adjacent down-arrow to pick the Download option.
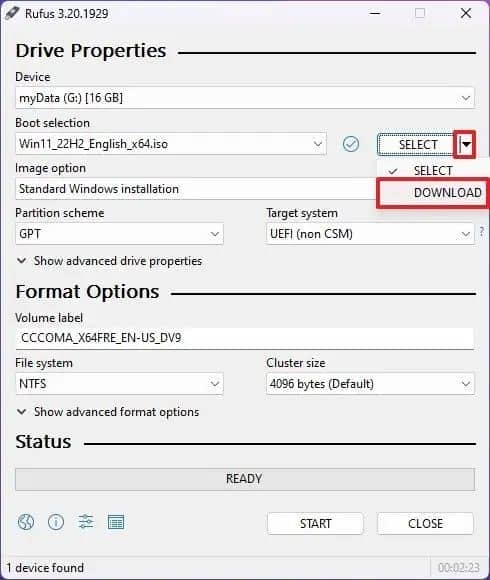
- Initiate the download.
- Opt for Windows 11.
- Proceed with the Continue option.
- For “Release”, choose the “22H2 (Build 22621.xxx – 2022.10)” to get the 2022 Windows 11 update.

- Continue further.
- Pick the Windows 11 Home/Pro/Edu variant.
- Progress with Continue.
- Choose your desired language for Windows 11.
- Move ahead with Continue.
- Opt for the x64 build.
- Start the download.
- Designate a save location for the Windows 11 22H2 ISO.
- For “Image option”, pick “Standard Windows 11 Installation”.
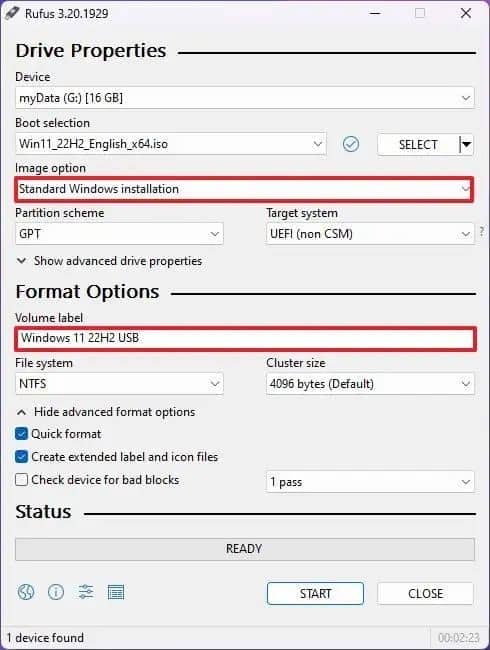
- (Optional) Retain default configurations post-download.
- Optionally, label the drive, e.g., Windows 11 22H2 Setup.
- Initiate with the Start option.
- Deselect the “Remove requirement for 4GB+ RAM, Secure Boot, and TPM 2.0”.
- Also, uncheck the “Remove requirement for an online Microsoft account”.
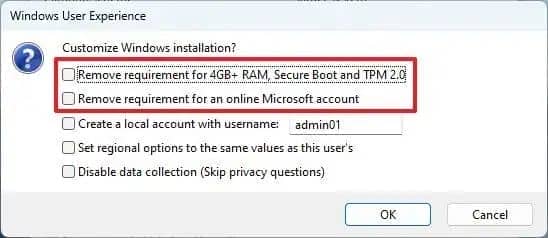
- Optionally, if you prefer a local over a Microsoft account (not advised), tick “Create a local account with username”.
- Confirm with OK. Upon finalizing these instructions, Rufus will start crafting the bootable medium with Windows 11 installation files.
Upon finalizing these instructions, Rufus will start crafting the bootable medium with Windows 11 installation files.

